Setting Up a Local Printer by Using Admintool
To set up a local printer, you need this information:
- • Printer name
- • Print server name
- • Description
- • Printer port
- • Printer type
- • File contents
- • Type of fault notification
- • Whether this is the default printer for the print client system
- • Whether you want to always print a banner page
- • Whether to specify a custom user access list
Use the following steps to add a local printer:
- 1. (If necessary) Type admintool& and press Return to start Admintool.
- 2. From the Browse menu, choose Printers.
- 3. From the Edit menu, choose Add and Local Printer. The Admintool: Add Local Printer window appears, as shown in Figure 11-4.
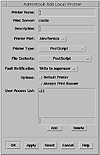
Figure 11-4 The Admintool: Add Local Printer window.
- 4. Enter the Printer Name and Description.
- 5. Choose the Printer Port, Printer Type, File Contents, and Fault Notification.
- 6. If you want to specify this printer as the default printer, click the Default Printer check- box.
- 7. If you want to always print the banner, click the Always Print Banner checkbox.
- 8. (If necessary) Modify the User Access List.
- 9. After you complete all of the setup steps, click OK. The printer is configured and the printer information is added to the list in the Admintool Printers window, as shown in Figure 11-5.
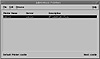
Figure 11-5 The Admintool: Printers window.
Printing Problems
When you set up a printer, you may find that nothing prints the first time you try to print a file. Or you may get a little farther: Something prints, but it is not what you expect—the output is incorrect or illegible. Then, when you get past these problems, you may encounter other problems, such as the following:
- • LP commands hang
- • Printers become idle
- • Users get conflicting messages
NOTE: Although many of the suggestions in this chapter are relevant to parallel printers, they are specific to the more common serial printers.
No Output (Nothing Prints)
When nothing prints, you want to check three basic areas:
- • The printer hardware
- • The network
- • The LP print service
Check the Hardware
The hardware is the first thing to check. As obvious as it sounds, make sure that the printer is plugged in, turned on, and online. In addition, refer to the manufacturer's documentation for information about hardware settings. Some computers use hardware switches that change the characteristics of a printer port.
The printer hardware includes the printer, the cable that connects it to the computer, and the ports at each end of the cable. As a general approach, work your way from the printer to the system.
Use the following checklist to troubleshoot hardware problems:
- 1. Check that the printer is plugged in, turned on, and online.
- 2. Check that the cable is connected to the correct port on the printer and to the correct port on the workstation or server.
- 3. Check that the cable is the correct cable and that it is not defective.
- 4. Refer to the manufacturer's documentation.
- 5. Check that hardware switches for the ports are set properly.
- 6. Check that the printer is operational. Use the printer's self-test feature if the printer has one. (Check the printer documentation for information about printer self-testing.)
- 7. (If applicable) Check that the baud settings for the computer and the printer are correct. If the baud settings are not the same for both the computer and the printer, sometimes nothing prints, but more often you get incorrect output.
Check the Network
Problems with remote jobs—those going from a print client to a print server—are common. Make sure that network access between the print clients and the print server is enabled.
If the network is running NIS+, check NIS+ configurations and credentials. If the network is not running NIS or NIS+, check to make sure that names and IP addresses of each client are correctly entered in the /etc/hosts file on the print server. Also check to be sure that the name and IP address of the print server are correctly entered in the /etc/hosts file of each print client system.
Use the following steps to check for problems with the network:
- 1. On a print client or server, type ping system-name and press Return. This command helps you check that the network link between the print server and print clients is set up correctly.
elm% ping maple
maple is alive
elm% ping oak
oak not available
elm%
If the system is alive (answers the ping), the network connection is probably all right. Either a naming service or the local /etc/hosts file has successfully translated the host (system) name you entered into an IP address.
If the system is not available, check the NIS or NIS+ setup at your site. You may need to take additional steps so that print servers and print clients can communicate with one another. If your site is not running NIS or NIS+, make sure that you have entered the IP address for the print server in the /etc/hosts file for each print client, and that you have entered all of the names and IP addresses of the client systems in the /etc/hosts file of the print server.
- 2. Check that the port monitor is configured correctly on the print server. For more information refer to “Print Server Setup” on page 223.
- 3. Check that the network listen services are registered with the port monitor on the print server. For more information refer to “Print Server Setup” on page 223.
)
)
)
)