![]()
Visitor:
![]()
Many Toyota trucks have separate turn signal and parking light assemblies. The parking light is mounted in the front edge of the fender and the turn signal is recessed in the front bumper. While this setup works fine with the factory bumper, it causes problems with many after-market bumpers.
 Here's
an example of how the stock turn signals mount on a typical aftermarket
dual tube front bumper. The turn signal mounts on the back of the
bumper, between the two tubes. A long screw passes through a triangular
bracket and the lens to hold it in place. This setup can cause trouble
in the winter, as snow can pack in front of the turn signals, getting
trapped between the bumper tubes and the mounting bracket. Unless the
snow is periodically cleared, it will mask the front turn signals. Also
the wiring is exposed behind the bumper, directly in front of the wheel
well.
Here's
an example of how the stock turn signals mount on a typical aftermarket
dual tube front bumper. The turn signal mounts on the back of the
bumper, between the two tubes. A long screw passes through a triangular
bracket and the lens to hold it in place. This setup can cause trouble
in the winter, as snow can pack in front of the turn signals, getting
trapped between the bumper tubes and the mounting bracket. Unless the
snow is periodically cleared, it will mask the front turn signals. Also
the wiring is exposed behind the bumper, directly in front of the wheel
well.
My other vehicle has a fender-mounted turn signal/parking light assembly that utilizes one socket holding a #1157 dual-filament bulb. This seemed like a better solution, so I set about designing a retrofit for the Toyota parking light assembly. I went to the local auto parts store and found a universal dual-contact lamp socket for an #1157 dual-filament bulb. Note that this is the same bulb that is used in the rear parking/brake light socket. The socket is about 3/4" in diameter and includes a separate metal mounting plate. The #1157 bulb is about 1" in diameter, so this determined the size of the hole in the back of the reflector.
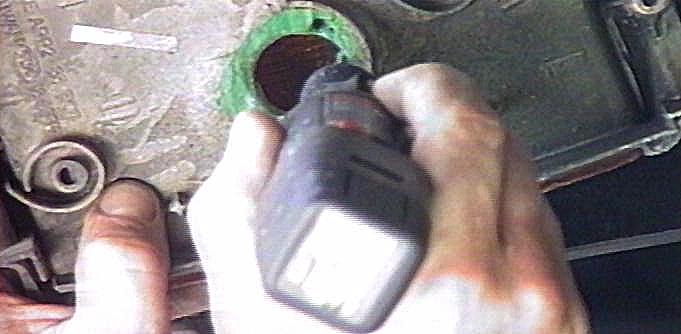 Take
out the stock lamp socket and enlarge the hole to the diameter of the
bulb with a small grinder. Then, use epoxy putty to build up the back
of the reflector to provide a flat surface for the mounting plate.
Drill two pilot holes for the mounting screws used to attach the socket
to the back to the reflector. To duplicate the sealed socket used by
Toyota, run a bead of silicone around the base of the socket and let it
cure, forming a gasket to seal the back of the reflector.
Take
out the stock lamp socket and enlarge the hole to the diameter of the
bulb with a small grinder. Then, use epoxy putty to build up the back
of the reflector to provide a flat surface for the mounting plate.
Drill two pilot holes for the mounting screws used to attach the socket
to the back to the reflector. To duplicate the sealed socket used by
Toyota, run a bead of silicone around the base of the socket and let it
cure, forming a gasket to seal the back of the reflector.
Now its time to wire up the new socket. First, cut the turn signal and parking light sockets off, retaining the stock connectors. Its a good idea to label the two connectors because they are identical. Then, run the turn signal wires up inside each fender. Determine the ground wires for each circuit and attach them to the new lamp base. Finally, connect the remaining turn and park wires to the proper filaments:
- Bright filament = Turn signal
- Dim filament    = Parking light
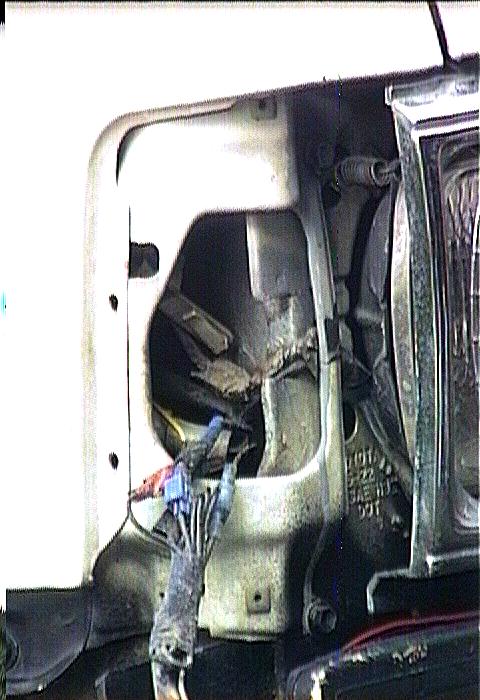 Since
the new socket protrudes farther from the reflector than the stock one,
you may have to notch out a bit of sheet metal behind the reflector to
allow the deeper bulb holder fit. A shot of rust-resistant primer on
the freshly cut metal will keep it from rusting.
Since
the new socket protrudes farther from the reflector than the stock one,
you may have to notch out a bit of sheet metal behind the reflector to
allow the deeper bulb holder fit. A shot of rust-resistant primer on
the freshly cut metal will keep it from rusting.
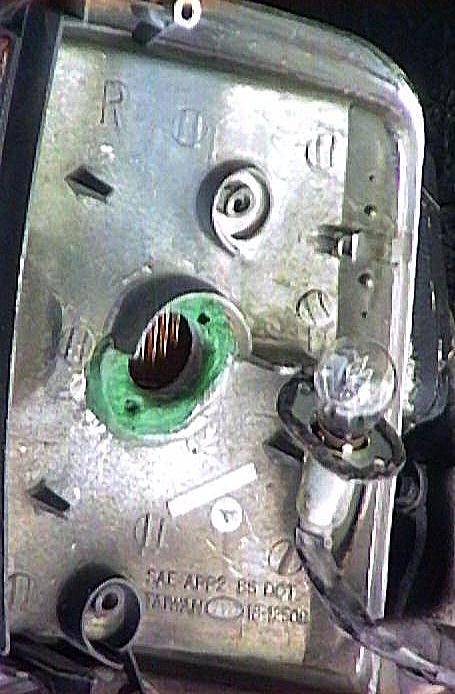 Here's
the finished assembly. In this picture, note the epoxy putty around the
lamp hole, the silicone around the socket base, the two screw holes for
attaching the socket and the new socket and bulb. The new turn signal
location is much more visible than the stock signal, especially to the
side. The larger reflector and bulb also make the signal a lot
brighter. With the lens up higher, it stays much cleaner. The wires are
tucked up inside the fender out of harms way. Finally, there's only one
bulb to keep track of instead of two. This project should take 1-2
hours to complete.
Here's
the finished assembly. In this picture, note the epoxy putty around the
lamp hole, the silicone around the socket base, the two screw holes for
attaching the socket and the new socket and bulb. The new turn signal
location is much more visible than the stock signal, especially to the
side. The larger reflector and bulb also make the signal a lot
brighter. With the lens up higher, it stays much cleaner. The wires are
tucked up inside the fender out of harms way. Finally, there's only one
bulb to keep track of instead of two. This project should take 1-2
hours to complete.
  2  Universal light sockets    $8
  2  1157 parking/turn bulbs     2
  1  Epoxy putty                 5
  --------------------------------
                               $15
Rating:

One side benefit of doing this modification is that you'll now know where the wiring for these lights are and how they are connected. Armed with this knowledge, projects like adding fog and driving lights are simplified. For example, when I installed fog lights, I wanted to make sure the fog lights could be on at any time other lights were on and would go off when lights were turned off. This was easily accomplished by powering the fog light relay from the parking light "hot" wire, i.e. the one that isn't common with the turn signal. Since I clearly labeled the connectors and wires, it was a simple matter to tap into this line to get switched power for the relay.
![]()
![]()
![]()