Visitor:
![]()
![]()
Have you noticed your starter turning slower and slower, or worse yet, you turn the key and all you get it a loud click and a dimming of the lights? If you answered yes to any of the above questions, your starter may be due for some R&R. My 22-RE equipped 1985 4Runner, had over 210,000 miles on it, and I'll bet the starter is bone stock. The starter is actually composed of two main marts, the series-wound starter motor itself and a solenoid which serves dual functions of pushing the drive gear into the flywheel as well as making a high-current contact to supply battery power directly to the motor. Starters can pull many hundreds of amps of current under load and the solenoid acts like a giant relay taking the low current signal from the ignition switch to control the high current for the motor.
The solenoid consists of a steel plunger that is pulled into an electro-magnetic coil, that is energized by the ignition switch. There is a rod extending from the plunger that actuates the starter gear and a spring on it to retract the gear after the engine starts. Also, at the other end of the plunger is a copper ring that makes contact with two copper contacts, one from the battery and the other that goes to the starter motor itself. When the plunger is pulled into the coil, the copper ring completes the circuit between the two contacts, current flows and the starter motor spins, driving the small gear which in turn spins the flywheel, making the engine turn over. Over time, the two contacts are eroded by the inductive arcing that occurs when the starter motor is started and stopped.
Whether you contemplate doing this repair now or in the future, by all means get the parts (see part numbers below) and carry them as spares. When you go in to get the parts, you'll either be told you need a new starter or that they have never heard of this part. In any event, don't be swayed, give them the part number (below), special order them and when they arrive in a few days, you'll be ready to tackle the repair. Since there are two contacts, get two kits, they don't cost that much and if it turns out you only need to replace one, you'll have a spare.
So, parts in hand, first step is to take off the starter. If you have a body lift, you are halfway there. If not, better start limbering up your arms. So, first thing is to disconnect the battery (+) lead, then pull off the connector and high current wire from the starter (12mm nut). Now, get a 14mm wrench and take off the bolt at the base of the starter and the nut at the top. Both screw out to the front of the engine. It will help if you either take off the passenger front tire or jack that corner up. Also, pull back the wheel well liner for better visibility.
Once the starter is loose, slide it forward then drop it down and clean it up before tearing into it. I sprayed mine down with brake cleaner to remove the accumulation of clutch dust and engine grease. Now, on a clean bench, remove the 3 Phillips head screws that hold the plate on the end of the solenoid next to where the battery lead connects.
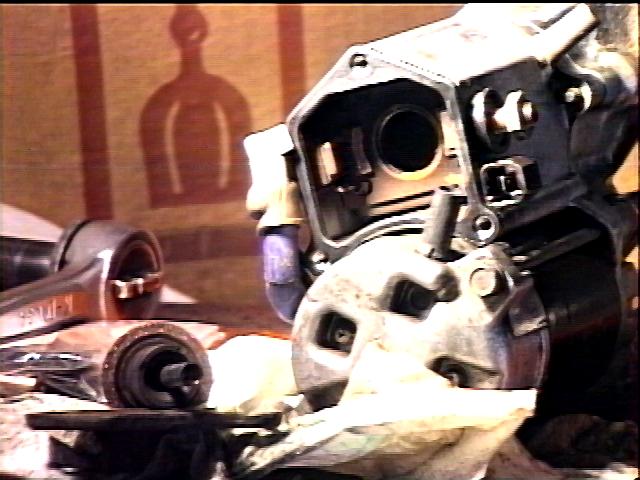 Carefully
pry off the cover and the plunger and its spring should pop out.
Examine the copper ring on the plunger and the two contacts. On mine,
notice how the contacts are worn. it looks as if a step has been
machined into the copper. In fact, aside from being dirty, they looked
normal, like this step was supposed to be there. Compare this with the
new contacts, that are flush all the way across their face. I think
what happens is that as the copper is worn away, the plunger bottoms
out and doesn't make full contact, resulting in the poor starting
performance. The contact on the battery side was worn almost all the
way through and the motor side (visible in the picture) was about
halfway gone. Spray down the inside with a good electrical cleaner. I
decided to replace both, keeping the better of the two as a trail spare
in my toolbox. Using a 14mm open end wrench, carefully back off the nut
holding the copper stud in place. There is only a bit of the nut
exposed, so be careful not to round off the corners. Notice too, the
pitted copper ring on the plunger, visible in the lower left corner of
the picture.
Carefully
pry off the cover and the plunger and its spring should pop out.
Examine the copper ring on the plunger and the two contacts. On mine,
notice how the contacts are worn. it looks as if a step has been
machined into the copper. In fact, aside from being dirty, they looked
normal, like this step was supposed to be there. Compare this with the
new contacts, that are flush all the way across their face. I think
what happens is that as the copper is worn away, the plunger bottoms
out and doesn't make full contact, resulting in the poor starting
performance. The contact on the battery side was worn almost all the
way through and the motor side (visible in the picture) was about
halfway gone. Spray down the inside with a good electrical cleaner. I
decided to replace both, keeping the better of the two as a trail spare
in my toolbox. Using a 14mm open end wrench, carefully back off the nut
holding the copper stud in place. There is only a bit of the nut
exposed, so be careful not to round off the corners. Notice too, the
pitted copper ring on the plunger, visible in the lower left corner of
the picture.
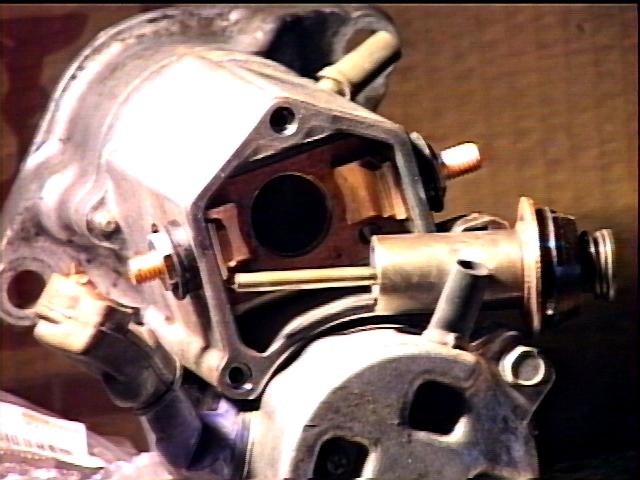 Do
one side at a time, so you can use the other as a guide to put it back
together. My starter kit came with all the parts of the assembly,
however, I found the stud on the motor side was not knurled at the base
like the one in the kit, so I re-used the original stud after replacing
the other parts. After rebuilding the contacts, I took a wire brush to
the copper ring on the plunger and put it all back together. Notice the
appearance of the new contacts.
Do
one side at a time, so you can use the other as a guide to put it back
together. My starter kit came with all the parts of the assembly,
however, I found the stud on the motor side was not knurled at the base
like the one in the kit, so I re-used the original stud after replacing
the other parts. After rebuilding the contacts, I took a wire brush to
the copper ring on the plunger and put it all back together. Notice the
appearance of the new contacts.
I put a bit of disk brake grease around the starter drive gear. Installation is the reverse of the removal process. I found it easier if I bent the bracket that holds the hose for the clutch slave cylinder off to the side, then hang the starter from the upper stud and get that nut started first. Then move the bracket back over and get the bottom bolt going through it and the starter into the bell housing. Finally, hit the connector on the wire from the battery with a wire brush and hook up all the wires and finally the battery. Now its ready for a test. I guarantee it'll feel like a brand new starter after this. Mine must spin at least twice as fast now!
I saved the half-worn starter-side contact for use as a spare. It seems that the starting problems are related to the unequal wear on both sides, since the plunger can only accomodate a small amount of height difference before it starts losing contact. So, my thought is that in another 200k miles, my battery-side contact will be worn out and the starter-side will be half gone. I'll now have a half-worn spare to put in for another 100k miles of use. Then at 500k, I imagine I'll need a new starter :-)
   $25 - qty. 2, Starter Kit, Toyota P/N 28226-72080
   Note: Use P/N 28226-72010 for the V6 starter - see write-up here for V6 details)
 - More w/o body lift, should take 1-2 hours.
![]()
![]()
![]()