![]()
Visitor:
![]()
![]()
After seeing the benefits of airing-down for off-roading (and its requisite airing-up to return home), the need for on-board air became apparent. While many of the developed off-road parks have air stations, some don't and most of the undeveloped locations are in remote areas. I had used a plug-into-the-lighter compressor in the past on my Land Cruiser, but found filling big tires to high pressures took f-o-r-e-v-e-r. Also, I could just see one of those things do the meltdown bit after filling 2 or 3 big meats. I have a big 12 CFM air compressor in my garage and a big collection of air tools. So, I felt it wise to get a source of on-board air that was useful for more than just filling tires.
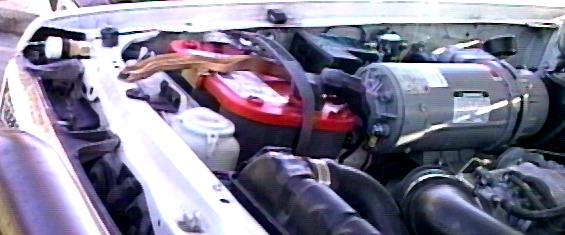
I looked around and found several sources of compressors. There were several in the $100-200 range that were under 1 CFM, that would be adequate for tire inflation, but lacked the oomph for air tools. I looked at modified A/C compressors, but was unwilling to give up my currently functioning A/C and also had no room for adding anything else to the cramped engine compartment (A/C, alternator, power steering, etc.). So then I stumbled on a few compressors in the $500 range, all but one was too big to fit in the engine compartment. The Currie unit, at 12" long was about as big as I could handle. It has a optional ~1/2 gallon tank, pressure switch, solenoid, and gauge. It is intended for continuous, unattended use and is oil-less. It actually consists of a Thomas motor/compressor assembly. I've heard Thomas manufactures a high quality unit.
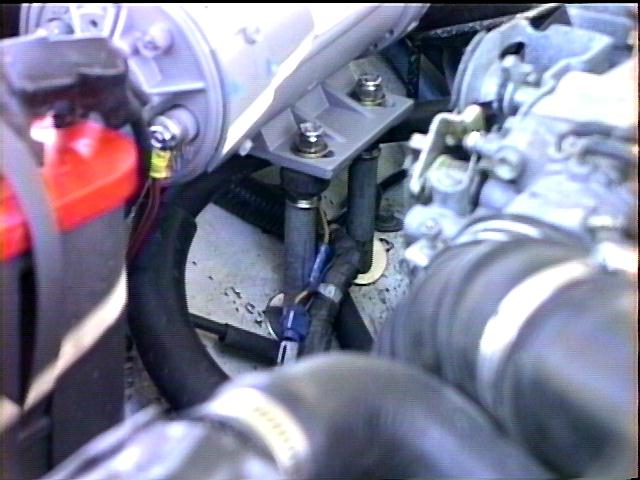
Here's what my installation looks like:
1.  |
2. |
3.  |
4. 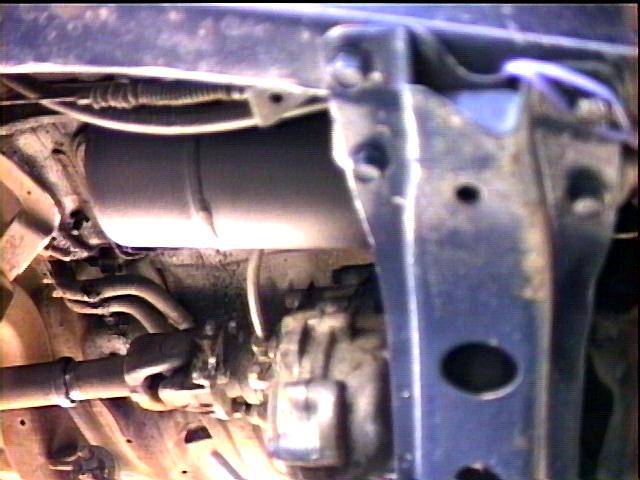 |
I also added a quick-disconnect chuck to my Quadra-Flate tire inflator. As shipped I find this unit to requires three hands to operate, as you need to hold the central valve/gauge assembly in one, hold the air chuck to it with another and then operate the manual valve with a third hand to check the tire pressure periodically. This way, I can just chuck it in and go.
I tested airing up all 4 33 x 9.50 BFG M/Ts and with an empty tank and engine off, I can fill them from 12 to 32 PSI in 7 minutes. With engine on and tank full, its about 6. On the other hand, filling 4 33x15.50 Super Swamper TSL/SXs from 10 to 30 PSI takes about 18 minutes.
After a year of use, I've had no problems with the unit. I am planning on modifying the air system a bit. If my front bumper holds air, I'll be plumbing it for use as an air tank. I'll be relocating the current air tank to free up the space for an auxiliary battery. I also want to reduce the amount of air hose in the system for better flow rates, right now, 1/4" hose runs from the compressor to the tank then out of the tank back to the outlet located near the compressor.
Cost:
  Compressor         $495
  Air Tank             75
  Mounting hardware    20
  Air hose/chucks/etc. 30
  Misc. electrical     10
  -----------------------
  Total              $630
Rating:
 and a few $$$ (but well worth it!)
I just got done plumbing my front bumper for air and it holds air, woo hoo! I get about 1 gallon on each side. I drilled 7/16" holes on the bottom side of the 3x5" tubing, tapped for 1/4" NPT and screwed in some right angle brass hose fittings. I plan on running the air hose to the back and doing a similar conversion on the back bumper for an extra 3 gallons of air.
A number of other sources of on-board air are available. Of the non-engine driven sources, I've compiled a list of air up times (35x12.50 tire measured in seconds) to use as comparison:
| Begin/End (psi) | Currie | QuickAir-II | ARB | PowerTank |
| 8 / 30 | 230 | 260 | 355 | 115 |
| 8 / 25 | 175 | 180 | 265 | 85 |
| 8 / 15 | 65 | 70 | 95 | 30 |
| 15 / 25 | 110 | 110 | 170 | 55 |
| 25 / 30 | 55 | 75 | 90 | 20 |
| Approx. Cost ($) | 495 | 255 | 25 | 299 |
| Run Time | Unlimited | 40 minutes | 40 minutes | 40 32" tires, 15-30 psi |
This data was measured without any air storage tank, except the PowerTank, which is nothing but an air (actually CO2) tank and the ARB which includes a small internal tank.
The modified air conditioning compressor is also a popular air source:
![]()
![]()
![]()