Visitor:
![]()
A body lift is one technique used to gain extra clearance for larger tires and to lift parts of the body higher to reduce the risk of damage from obstacles on the trail. A body lift is relatively easy and inexpensive to do, has the least impact on center of gravity (compared to suspension and tire mods) and can make installation of other items easier. On the downside, it adds no extra capability to the suspension, it adds extra stress to the body mounts and may require modifications to other components.
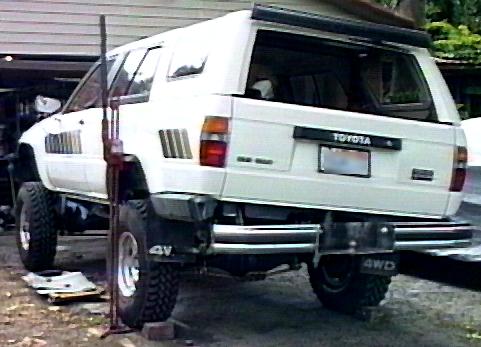
So why did I choose to do this to my truck? Well, actually I did it in stages; first installing polyurethane body mount bushings, then slipping in a few washers for the heck of it, and then finally doing it for real. This was taking place during the time I was deciding on front and rear bumpers and rocker panel protection. By lifting the body off the frame a bit, it allowed the Rock Sliderz and rear bumper to be mounted higher than would be possible without the lift. Since these were two problem areas on a 4Runner, every inch gained makes a huge difference. I decided on 1" as the most lift I could get without serious consequences.
 When
I first installed my new suspension, it seemed like a good time to
replace the stock rubber body/cab mounting bushings. I installed a set
of ProThane polyurethane body
mounts. There are a total of 10 on my 4Runner; 5 on each side. I was
actually missing the right rear bushing completely and the two front
ones were badly damaged due to improper bumper installation by the
previous owner.
When
I first installed my new suspension, it seemed like a good time to
replace the stock rubber body/cab mounting bushings. I installed a set
of ProThane polyurethane body
mounts. There are a total of 10 on my 4Runner; 5 on each side. I was
actually missing the right rear bushing completely and the two front
ones were badly damaged due to improper bumper installation by the
previous owner.
Comparing the stock rubber bushings to the new poly ones is interesting. The rubber is cracked and soft enough to squeeze between the fingers. The poly is firm, about like a skateboard wheel.
The best way I found to do the swap is to remove the nuts on one side of the truck (also helps to remove the bolts holding the front bumper). Then, use a HiLift jack, with a 2x4 under the lip of the rear fender, to lift the bolts clear of the bushings. I had to replace the front two mounting bolts, as they had been replaced with undersized standard bolts after a fender-bender a few years ago. I found 7/16" Grade 5 or 8 bolts do the job quite nicely.
I found the second set of bolts (from the front) are not captive and you'll need to pull the carpet up, pop the plastic plug and hold the bolt with a wrench from the top while turning the nut. The other bolts are captive, but can be accessed in a similar manner. In fact, you can remove them, drive the bolts out of the captive washer and drive in a new 7/16" bolt and they hold tight. I did this so I could add aero-lock nuts to the all the bolts.
The new polyurethane body mounts are the best improvement you can do to the truck's ride. They completely eliminated the shudder and really reduced rattles. Since they tie the body to the frame much more securely, the body doesn't vibrate or shudder like it used to.
Urethane body mounts:       35
------------------------------
Total:                     $35

I needed to get a little bit of body lift for added clearance of the front and rear bumpers as well as to make room for my Rock Sliderz. I felt 1" would do the job nicely. Since nobody makes 1" body lift kits for Toyota, I decided to design my own from available hardware. I found some 3/4" standard washers at the local hardware store. They are stamped from 1/8" thick steel and measure about 2" in diameter and they cost about $0.20 each. Next, I found 3/8" galvanized pipe has an inner diameter just over 7/16" and an outer diameter a bit over 1/2". I cut 1" sections of pipe, and stacked up 8 washers on top of the body mount washer. The pipe goes in the center of the washers and I used a polyester resin/filler to cement the washers and pipe into one solid unit.
Its important to make the body lift block one solid piece, otherwise it can shift. Also, I feel the use of polyurethane body mount bushings is important with a body lift as well. The stock rubber bushings are way to soft to handle the added shearing stress of the lift and some aftermarket lift kits use no bushings at all. You end up with the body rigidly mounted to the frame which eventually leads to stress cracks in the body sheet metal.
The body lift went quite well, taking an afternoon. With my electric radiator fan, I did not need to make any changes in the engine compartment. With the stock fan, you'll have to makes adjustments to the radiator mounts in order to re-center the fan within the radiator shroud. I ended up re-mounting the radiator anyway. I used two pieces of 1x1/8" flat aluminum stock, drilled and riveted to the radiator mounting flange. Then I drilled 4 new mounting holes 1" above the stock holes (to lower the radiator) and re-installed the radiator. This places the top tank of the radiator about even with the front of the grill. My old radiator had a nice dent in top, no doubt caused by someone leaving a wrench over the tank and closing the hood. I replaced the aftermarket 2-row radiator with a new 3-row GoDan (GDI) unit for extra cooling.
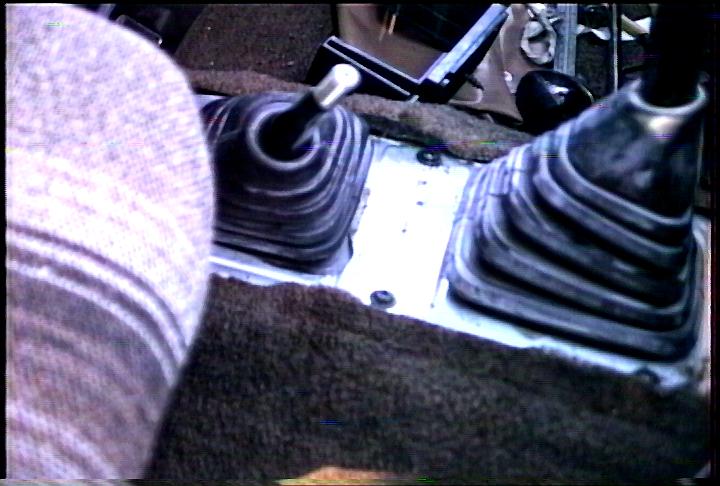 Inside,
I needed to nibble away some sheet metal in front of the transfer case
shift lever. The lever would hit the metal in 4L and would knock it out
of gear. Other than that, there is enough slack and play in all the
other components to accommodate a 1" lift.
Inside,
I needed to nibble away some sheet metal in front of the transfer case
shift lever. The lever would hit the metal in 4L and would knock it out
of gear. Other than that, there is enough slack and play in all the
other components to accommodate a 1" lift.
This lift ended up costing me half of an off-the-shelf body lift kit. It made it possible to install my rear bumper an inch higher than otherwise possible and also made a more secure installation for my Rock Sliderz. It also allowed my 33" tires to compress upwards an extra inch which proved useful once I softened up my springs.
One side effect of a body lift is that the stock wheel well liners no longer cover the space between the wheel well and the frame. I was missing the front left one anyway, so here's how I installed new liners to cover this gap.
NOTES:
80 3/4" washers             15
12" 3/8 galv. pipe           3
Polyester filler             2
10 7/16 bolts               10
10 7/16 lock nuts            5
------------------------------
Total:                     $35
![]()
![]()
![]()