Follow these steps to create a local password:
- 1. Become superuser on the local system.
- 2. Type passwd login-name and press Return. The prompt New password: is displayed.
- 3. Type the new password and press Return. The prompt Re-enter new password: is displayed.
- 4. Retype the password and press Return. The password is assigned and added to the /etc/shadow file:
oak% su
# passwd smallberries
New password:
Re-enter new password:
#
NOTE: You can also use passwd to define, change, and view password attributes, such as password aging. See the passwd(1) manual page for more information.
Changing a local password is similar to changing an NIS+ password. When prompted to do so, type the old password, and then the new password two times.
The Admintool: Users Window
 You can use the Admintool: Users window to add, modify, and delete user accounts on a local system.
Always run Admintool using your own UID, not as root. You must be a member of the sysadmin group (GID 14). If the network is running NIS+, you also need create and delete permissions on the NIS+ databases.
Adding a User Account
Follow these steps to add a user account to a local system with the Admintool: Users window:
- 1. In a terminal window, type admintool& and press Return. The Admintool: Userswindow is displayed, as shown in Figure 7-1.
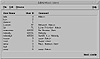
Figure 7-1 The Admintool:Users window
- 2. From the Browse menu, choose Users, as shown in Figure 7-2 (if necessary).
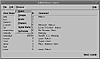
Figure 7-2 The Users Browse menu
- 3. From the Edit menu, choose Add, as shown in Figure 7-3.
The Admintool: Add User window is displayed, as shown in Figure 7-4.
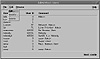
Figure 7-3 The Users:Edit menu.
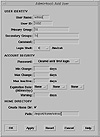
Figure 7-4 The Admintool: Add User window.
- 4. Type the user's login name in the User Name text field. Choose a login name unique to your organization with two to eight lowercase characters and digits (excluding colons).
- 5. Type the UID number in the User ID text field. Choose a number between 100 and 60000 or between 60003 and 2147483647 that is unique to your organization. By default the Admintool: Add User window assigns a default UID number, sequentially starting with 1001.
- 6. Type the user's group name or group number in the Primary Group field. The default primary group number is 10.
- 7. If the user is assigned to any secondary groups, type the names or numbers of the additional groups in the Secondary Groups text field.
- 8. Type identifying information about the user in the Comment text field.
- 9. Choose a default login shell for the user from the Login Shell menu.
- 10. Choose a password status from the Password menu.
- 11.If you want additional password aging information, set it in the appropriate text fields.
- 12. If you want to automatically create the user's home directory, click SELECT on the Create Home Dir checkbox.
- 13. Type the path of the home directory to be entered in the Passwd database in the Path text field. If you checked the Create Home Dir box, the home directory is created.
- 14. When you have filled in all the information, click on the OK button. The information is added to the /etc/passwd, /etc/shadow, and /etc/group files. If specified, the user's home directory is created with the proper ownership.
- 15. Set up the user initialization files manually, as described in "Defining the User's Environment."
Administering User Accounts
Administering user accounts includes modifying, removing, and disabling the accounts.
Modifying User Accounts
When information about the user changes, use the Admintool: Users window to edit the information in the /etc/passwd file. Unless you define a user (login) name or UID that conflicts with existing ones, you probably will not need to modify a user account's login name or UID.
In a network environment, you may need to change the Auto_home database for the user's home directory when users move from one system to another, and from one server to another.
If you need to modify user passwords, use the passwd (no naming service), yppasswd (NIS), and nispasswd (NIS+) commands.
 To modify a user account by using Admintool, you must be a member of the sysadmin group (GID 14). If you want to change a user's home directory, create the new directory (mkdir) before making changes by using the Admintool: Users window.
Follow these steps to modify a user account:
- 1. In the Admintool: Users window, click on thei user account you want to modify, as shown in Figure 7-5.
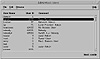
Figure 7-5 Highlighting a user account.
- 2. From the Edit menu, choose Modify, as shown in Figure 7-6.
The Admintool: Modify User window is displayed, as shown in Figure 7-7.
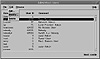
Figure 7-6 Choosing Modify from the Edit menu.
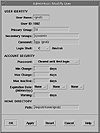
Figure 7-7 The Admintool: Modify User window
- 3. Make the modifications to the iuser account.
- 4. When the changes are complete, click on the OK button. The changes are made to the user account.
Deleting User Accounts
Here is a checklist for deleting a user account:
- • Delete the user's entry from the NIS+ Passwd database, NIS map, or /etc/passwd files.
- • Remove the user's name from entries in the NIS+ Group database, NIS map, or /etc/group files.
- • Remove the user from any printer access or deny lists.
- • Decide whether you want to delete or archive all of the user's files.
- • Delete the user's mail file.
- • Remove the user from the Auto_home database.
Deleting a User Account Using Admintool
 To delete a user account using Admintool, you must be a member of the sysadmin group (GID 14).
Follow these steps to delete a user account:
- 1. From the Admintool: Users window, click on the user account you want to delete. The user account is highlighted.
- 2. From the Edit menu, choose Delete. An alert window is displayed, as shown in Figure 7-8,asking you to confirm or cancel the action.
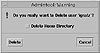
Figure 7-8 Alert window
- 3. If you want to delete the home directory along with the user account, click on the Delete Home Directory check box.
- 4. Click on the Delete button to delete the user account. The user account is deleted and removed from the list in the Admintool: Users list. If you checked the Delete Home Directory check box, the home directory is also deleted. If you want to retain the account, click on the Cancel button to dismiss the window.
)
)
)
)
)
)
)
)
)
)
)
)
)
)
)
)