Setting Up a Local Printer by Using Admintool
 You can use Admintool to set up access to a printer or to configure a local printer. To use the Admintool: Printers windows, you must be a member of the UNIX sysadmin group (GID 14).
To set up a print client, you need this information:
- • Printer name
- • Print server name
- • Description
- • Whether this is the default printer for the print client system
Use the following steps to access a network printer:
- 1. Type admintool& and press Return to start Admintool (if necessary).
- 2. From the Browse menu, choose Printers. The Admintool: Printers window is displayed, as shown in Figure 6-4.
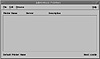
Figure 6-4 The Admintool: Printers window.
- 3. From the Edit menu, choose Add and Access to Printer. The Admintool: Add Access To Printer window is displayed, as shown in Figure 6-5.
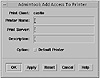
Figure 6-5 The Admintool: Add Access To Printer window.
- 4. Enter the printer name, print server name, and description.
- 5. If you want this printer to be the default printer, click on the Default Printer check box.
- 6. Click on the OK button. The printer is configured and the printer information is added to the list in the Admintool: Printers window.
To set up a local printer, you need this information:
- • Printer name
- • Print server name
- • Description
- • Printer port
- • Printer type
- • File contents
- • Type of fault notification
- • Whether this is the default printer for the print client system
- • Whether you want to always print a banner page
- • Whether to specify a custom user access list
Use the following steps to add a local printer:
- 1. Type admintool& and press Return to start Admintool (if necessary) .
- 2. From the Browse menu, choose Printers.
- 3. From the Edit menu, choose Add and Local Printer. The Admintool: Add Local Printer window is displayed, as shown in Figure 6-6.
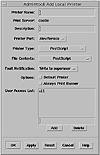
Figure 6-6 The Admintool: Add Local Printer window.
- 4. Enter the printer name and description.
- 5. Choose the printer port, printer type, file contents, and fault notification.
- 6. If you want to specify this printer as the default printer, click on the Default Printer check box.
- 7. If you want to always print the banner, click on the Always Print Banner check box.
- 8. (If necessary) modify the user access list.
- 9. When you have completed all of the setup, click on the OK button. The printer is configured and the printer information is added to the list in the Admintool: Printers window, as shown in Figure 6-7.
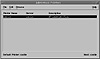
Figure 6-7 The Admintool: Printers window.
Setting Up a Print Server (Solaris 2.x)
 This section describes how to add a network printer by using LP commands.
You need this information to set up a Solaris 2. x print server:
- • Printer name.
- • Server name.
- • Network printer access name, sometimes qualified by a port name.
- • IP address for the printer.
- • Protocol. The print subsystem uses the BSD print protocol and raw TCP to communicate with the printer. In general, the TCP protocol is more generic. The printer vendor documentation will provide the information about which protocol to use.
- • Timeout value. The timeout option specifies the amount of time in seconds to wait between successive attempts to connect to the printer. The default is 10 seconds. Some printers have a long warm-up time and a longer timeout is advised.
- • Printer type. The default is PostScript.
- • File content type. The default is PostScript
- • Fault notification policy for this print server. The default is write to superuser.
Follow these steps to set up a print server:
- 1. Connect the printer to the network and turn on the power to the printer. Consult the printer vendor installation documentation for information about hardware switches and cabling requirements. Get an IP address and select a name for the printer node. These procedures are equivalent to those for adding any new node to the network.
- 2. Become superuser.
- 3. Type lpadmin -p printer-name-v /dev/null and press Return. This step defines the printer name and the port device the printer uses. The device to use is /dev/null.
- 4. Type lpadmin -p printer-name -i /usr/lib/lp/model/netstandard and press Return. This step defines the interface script the printer uses.
- 5. Type lpadmin -p printer-name -o dest= access-name:port -o protocol= protocol -o timeout= value and press Return. This step sets the printer destination, protocol, and timeout values.
- 6. Type lpadmin -p printer-name- I content-type - T printer-type and press Return. This step specifies the file content type and the printer type.
- 7. Type cd /etc/lp/fd and press Return. You are in the filter directory.
- 8. Type for filter in *.fd;do and press Return.
- 9. At the > prompt, type name=`basename $filter .fd` and press Return.
- 10. At the > prompt, type lpfilter -f $name -F $filter and press Return.
- 11. At the > prompt, type done and press Return. You have installed filters.
- 12. Typeaccept printer-name and press Return. The printer is able to accept requests.
- 13. Type enable printer-name and press Return. The printer is enabled to print the requests.
- 14. Type lpstat -p printer-name and press Return. This step verifies that the printer is configured correctly.
- 15. Set up any print clients that you want to be able to access this printer.
)
)
)
)
)
)
)
)