Using Admintool: Serial Ports to Configure Modems
 You can use the Admintool: Serial Ports graphical user interface to configure SAF for modems on a local system. You can also use the Solstice AdminSuite Serial Port Manager to configure SAF for modems.Table 10-3 shows the Admintool default values for a dial-in modem.
Table 10-3 Modem--Dial-In Only Default Values
|
| Item
| Default Value
|
| Port
| a | b | other port identifier* |
| Service
| enabled
|
| Baud rate
| 9600
|
| Terminal type
| tvi925
|
| Option: Initialize only
| no* |
| Option: Bidirectional
| no
|
| Option: Software carrier
| no
|
| Login prompt
| ttyn login:* |
| Comment
| Modem--Dial-In Only
|
| Service tag
| ttyn* |
| Port monitor tag
| zsmon
|
| Create utmp entry
| yes
|
| Connect on carrier
| no
|
| Service
| /usr/bin/login
|
| Streams modules
| ldterm,ttcompat
|
| Timeout (secs)
| never
|
|
*Revised in this edition.
Table 10.4 shows the Admintool default values for a dial-out modem.
Table 10.4 Modem--Dial-Out Only Default Values
|
| Item
| Default Value
|
| Port
| a | b | other port identifier* |
| Service
| enabled
|
| Baud rate
| 9600
|
| Terminal type
| tvi925* |
| Option: Initialize only
| yes* |
| Option: Bidirectional
| no
|
| Option: Software carrier
| no
|
| Login prompt
| ttyn login:* |
| Comment
| Modem--Dial-Out Only
|
| Service tag
| ttyn* |
| Port monitor tag
| zsmon
|
| Create utmp entry
| yes
|
| Connect on carrier
| no
|
| Service
| /usr/bin/login
|
| Streams modules
| ldterm,ttcompat
|
| Timeout (secs)
| never
|
|
*Revised in this edition.
Table 10.5 shows the Admintool default settings for bidirectional modem service.
Table 10.5 Modem--Bidirectional Default Values
|
| Item
| Default Value
|
| Port
| a | b | other port identifier* |
| Service
| enabled
|
| Baud rate
| 9600
|
| Terminal type
| tvi925*
|
| Option: Initialize only
| no
|
| Option: Bidirectional
| yes
|
| Option: Software carrier
| no
|
| Login prompt
| ttyn login:* |
| Comment
| Modem--Bidirectional
|
| Service tag
| ttyn* |
| Port monitor tag
| zsmon
|
| Create utmp entry
| yes
|
| Connect on carrier
| no
|
| Service
| /usr/bin/login
|
| Streams modules
| ldterm,ttcompat
|
| Timeout (secs)
| never
|
|
*Revised in this edition.
Use the following steps to configure SAF for a modem from the Admintool Serial Ports window:
- 1. In the Admintool: Serial Ports window, click the port that will be used with the modem.
- 2. From the Edit menu, choose Modify. The Admintool: Modify Serial Port window is displayed, as shown in Figure 10-1.
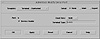
Figure 10-1 Admintool: Modify Serial Port window.
- 3. Click the Expert radio button to display all of the settings, as shown in Figure 10-2.
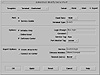
Figure 10-2 Admintool: Modify Serial Port window with Expert options.
- 4. Choose the modem configuration from the Template menu that meets or most closely matches your modem service.
- 5. Change the values of template entries if desired. If you change the values, make sure that you change the comment field so that other users know that you have changed the default values.
- 6. Click OK to configure the port.
Setting Up the SAF for Character Terminals
The Solaris 2.x system software is automatically configured to work properly with Sun graphics display monitors. You do not need to do any additional SAF configuration to use them. The word terminal is used in this chapter to describe a character terminal--a serial port device that displays only letters, numbers, and other characters, such as those produced by a typewriter. The VT100 model, for example, is a popular type of character terminal that many other terminals can emulate.
Not all systems require character terminals. You may want to attach a character terminal to a server as an inexpensive control console or to a malfunctioning system's serial port to use for diagnostics.
If you do attach a character terminal to a system, you need to use the SAF to set it up. See Chapter 9, "Understanding the Service Access Facility," for background information about terminal control.
Terminal Connection
Use a null modem cable to connect a character terminal to serial ports on Sun systems. A null modem cable swaps lines 2 and 3 so that the proper transmit and receive signals are communicated between two DTE devices. Line 7 goes straight through, connecting pin 7 of the devices at each end of the null modem cable.
)
)
)
)